A rundown of Givenergy Inverter API Data for integration in other devices & systems. At the bottom of this page is a download link to a variety of API examples should you already be familiar with this kind of thing.
Looking to use Node-Red instead? See here
Modified for latest Givenergy API Release V1.0 – Last Updated 12/04/2022
What Does an API Do?
An API (Application Programming Interface) is basically one of the many ways to get data in and out of a system. It can involve human input (to change settings) or can be automated (basically you use one machine to control the other) through various rules and commands.
Givenergy have released their own API to the public which allows users to both read & write to the system to control it as required. This can be something as simple as pulling the latest PV output power to display on a webpage to controlling charge & discharge of the system for something as complex as Octopus Agile.
This page tries to explain with working examples the majority of the API and examples of what can be done with them.
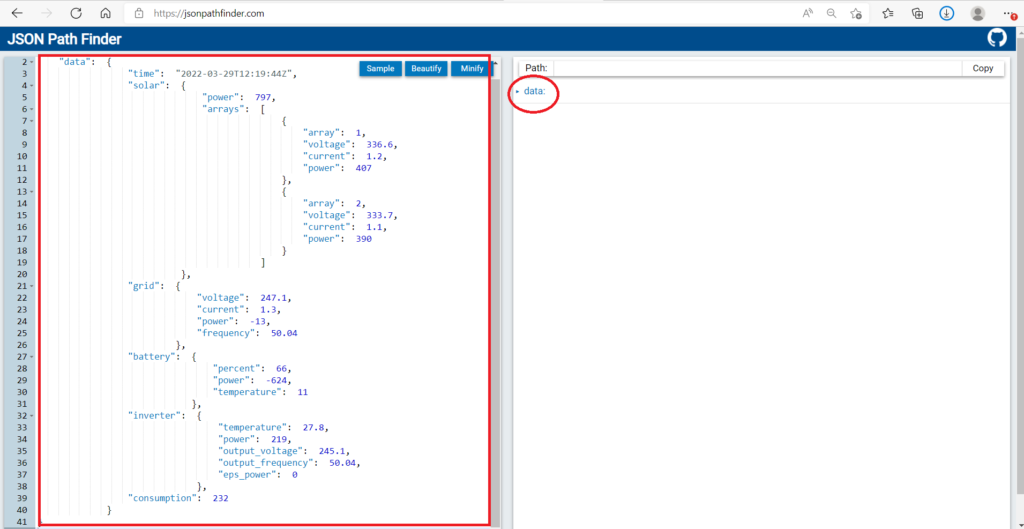
An example of the typical Givenergy API output is shown below:
{
    "data":  {
                 "time":  "2022-03-29T12:19:44Z",
                 "solar":  {
                               "power":  797,
                               "arrays":  [
                                              {
                                                  "array":  1,
                                                  "voltage":  336.6,
                                                  "current":  1.2,
                                                  "power":  407
                                              },
                                              {
                                                  "array":  2,
                                                  "voltage":  333.7,
                                                  "current":  1.1,
                                                  "power":  390
                                              }
                                          ]
                           },
                 "grid":  {
                              "voltage":  247.1,
                              "current":  1.3,
                              "power":  -13,
                              "frequency":  50.04
                          },
                 "battery":  {
                                 "percent":  66,
                                 "power":  -624,
                                 "temperature":  11
                             },
                 "inverter":  {
                                  "temperature":  27.8,
                                  "power":  219,
                                  "output_voltage":  245.1,
                                  "output_frequency":  50.04,
                                  "eps_power":  0
                              },
                 "consumption":  232
             }
}
OK so that’s pretty boring but it does tell you a lot of key information about what the inverter is doing “right now” – So what you could do is take that information and create something like the display below (note the import/export figures across the top and the gauges on the lower right hand side.) By regularly updating the data throughout the day (called “polling”) to create yourself a nice little home energy monitor or even this website.

Background Information
So before we get into pulling information from the API itself we need to cover a few basic things first.
1: Programming/Scripting Language – So this is essentially as it sounds, it’s the language of the system you use to create a program. In this instance all the examples we will use will be done in Microsoft Powershell. It’s present on most Windows machines and therefore offers a fairly simple introduction to gathering data from an API and storing it. There are hundreds of other languages that could be used, all with there own pro’s and cons but the theories of how to talk to an API will roughly follow the same kind of pattern.
2: JSON or Javascript Object Notation is a method of representing structured data such that it is (fairly) easy for both machines & humans to understand. You’ve actually already seen some of it here. The example output from the API above.
OK so that example is fairly easy to follow but data structures can get very complex and you need to “drill down” a lot of different sub streams of data to actually SELECT the data you want. You can do this by using something called “dot notation” – where you drill down each data section to the data point you need by adding a ” . ” between each sub array of data. Very similar to how directories for files and folders work on your PC.
This is far easier to describe by doing it yourself so lets give it a try:
A: Copy ALL the earlier example above (“Typical Givenergy API Output”) and paste into the JSON Path Finder site: (remember you’ll need to clear the example text first on the JSON Path Finder)
You should see something like the below:
B: On the right hand side you should see the word data. Click it and it should drill down to show more sections of the data (which is just a neatly organised version of the text on the left hand pane.)
C: Say we want to select some data from the First PV string, specifically the voltage of that PV string. Using our windows analogy, it would be similar to finding a file in “C:\data\solar\arrays[0]\voltage”.
If you click down the data until you reach this data point you should at the top get the following “path”
x.data.solar.arrays[0].voltage
(This should give you a voltage of: 336.6)
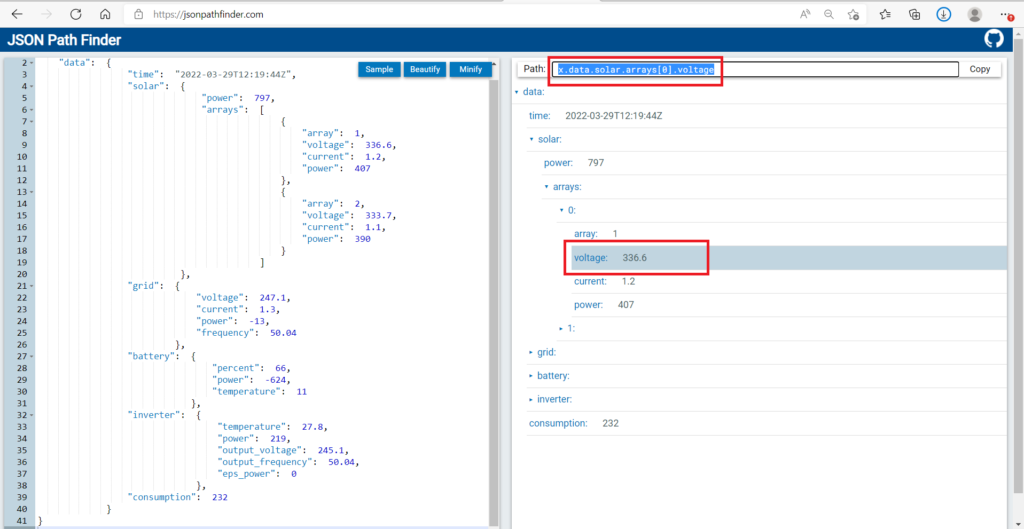
Note the dots between each “directory” of data? That’s essentially Dot Notation. So later on we could assign that “path” to a variable and call up only that piece of information to manipulate it or “do something” to it.
3: Variables: In programming, variables are used to store information to be referenced and used by programs later.
We can either specifically define a variable ourselves:
Example:
$Battery_Power = 100
This (in Powershell) would create a variable named “Battery_Power” (the $ sign signifies a variable) and would set it’s value to 100. We could then further down the program use this to tell the API we want the Battery Power to be set to 100 (which in this use case would be 100%) by simply sending it the $Battery_Power variable rather than having to type in the value of “100” in each time.
BUT, variables are also…well…variable… the above example is YOU setting the variable to a specific value before the program runs. You can also change the variable value (but not it’s name!) to something else mid program based on a condition of something else.
Example:
if ($x.data.solar.arrays[0].voltage -gt 300){
$Battery_Power = 50
}
This would in essence check the value of PV String 1 voltage and if it’s greater than 300, set our $Battery_Power variable to 50 (down from the 100 we had it set to earlier.) if true.
This would trigger on this occasion as the string voltage as we already know is 336.6
It can all get as simple or as complex as you like but the above is some of the basic key points you’ll need to know for any of this to make sense.
I will point out though that it is good to learn as this doesn’t just apply to the Givenergy API but programming in general.
The Givenergy API
So the Givenergy API Documentation is listed here. In all instances of something not working it would be a good idea to go check this first and make sure that whichever thing your trying to do has not been changed (such as the URL path or parameters required.) I’ll try my best to keep ontop of everything but things move fast and this is far from my day job.
First things first is to acquire your API key. It’s a (very) long stream of gibberish that essentially performs a similar function to a username & password. This is how the API knows
a) who you are (and by definition which Inverter your trying to talk to)
and
b) more importantly, you have permission to access the inverter at all. It would be a very poor API if you could control someone else’s devices!
You get your API key by going to your account page of the Givenergy portal.
Generate a key but remember to save it somewhere (although it does also email you a copy)
You will need this key for pretty much every call to the API so remember if you ever reset the key you’ll need to change it in every single script/program that uses the API.
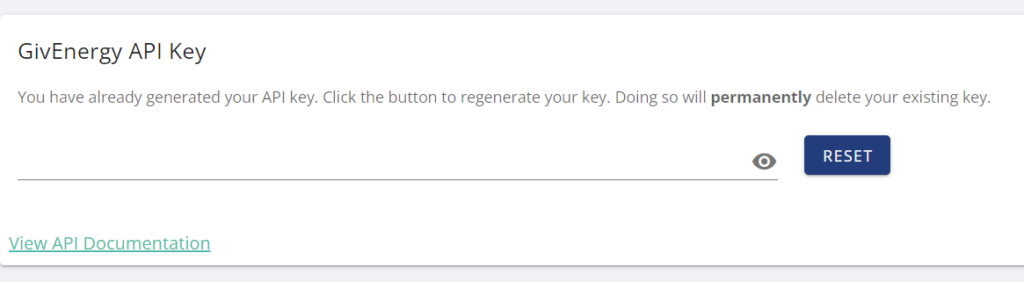
DO NOT SHARE YOUR KEY – IT ALLOWS ANYONE WITH IT TO CONTROL YOUR INVERTER!
(and if you do accidentally share it, resetting the key in the portal will block the old one…)
As a start, lets simply pull the latest status information from the inverter (which is basically what I did for the example we just looked at.) In the API docs that would be this call to the URL: https://api.givenergy.cloud/v1/inverter/consequatur/system-data/latest
(Note: Consequatur is just a pointlessly obtuse way of saying “you need to change this to suit your own specific situation” – In this case you replace the word with your Inverter ID so for this example, what we actually need to send would become:
https://api.givenergy.cloud/v1/inverter/SDXXXX12345/system-data/latest
The docs also state that you need to provide the following information in the “headers” of the request along with the URL:
“Authorization: Bearer {YOUR_API_KEY}”
“Content-Type: application/json”
“Accept: application/json”
The headers stay the same for every call. I’m not going to go into details of how headers work but they get sent along with the URL request and form a key part of the back and forth telling the API who you are & how to format the data you want returning. (As opposed to the URL itself which is basically just telling the API what you actually WANT.)
Finally, note the Request type: GET.
There are 2 types used for the Givenergy API. It’s probably easier to think of these like an email:
GET – Similar to sending a blank email. You send to an “address” (the API URL) and you include some info in the “Subject” line (the Headers we mentioned) but you don’t put anything in the actual email message (the Body of the request)
POST – Is almost exactly as above, but instead of you sending a “blank email” you actually include some information in the message (the Body.) This is usually a value you want to send to the API to get it to do something.

Example 1 (Getting Data OUT):
So onto the good stuff. Start up Powershell ISE (On windows click the start menu then just start typing Powershell. It’s usually the second one in the list and is the lighter blue of the 2 items windows search will probably give you – if you get a dark blue command line window then you’ve opened the wrong one!)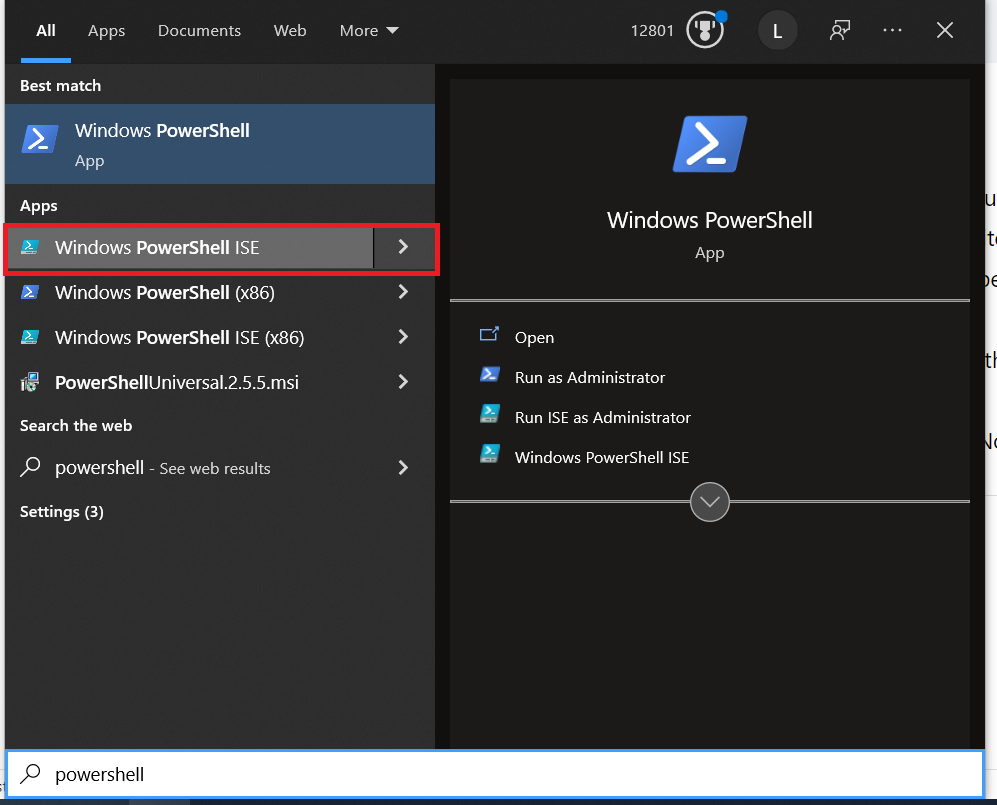
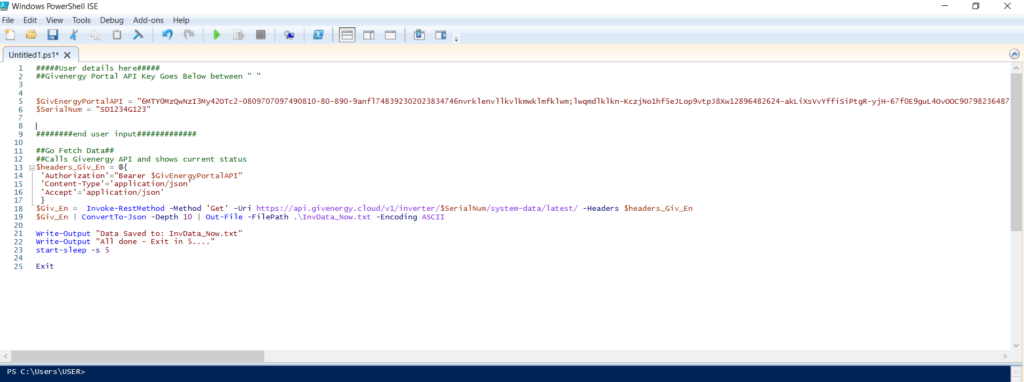
Copy and paste the below into the ISE: (Don’t worry I’ll explain each line below) then File>Save As>(Wherever you want & whatever name you want)
Powershell files are suffixed .PS1 (they can also be opened, edited or written in Notepad should you wish)
#####User details here#####
##Givenergy Portal API Key Goes Below between " "


$GivEnergyPortalAPI = "YOUR_COMICALLY_LONG_API_KEY_GOES_HERE"
$SerialNum = "INVERTER_SERIAL_GOES_HERE"


########end user input#############

##Go Fetch Data##
##Calls Givenergy API and shows current status
$headers_Giv_En = @{
 'Authorization'="Bearer $GivEnergyPortalAPI"
 'Content-Type'='application/json'
 'Accept'='application/json'
 }
$Giv_En =  Invoke-RestMethod -Method 'Get' -Uri https://api.givenergy.cloud/v1/inverter/$SerialNum/system-data/latest/ -Headers $headers_Giv_En
$Giv_En | ConvertTo-Json -Depth 10 | Out-File -FilePath .\InvData_Now.txt -Encoding ASCII

Write-Output "Data Saved to: InvData_Now.txt"
Write-Output "All done - Exit in 5...."
start-sleep -s 5

Exit
Which (once you’ve replaced the $GivEnergyPortalAPI and your Inverter $SerialNum between the inverted commas in the top half of the script (note: The Inverter Serial can be found in the portal on the inverter page, you don’t have to go out in the cold to read it off the sticker!) should look a bit like this:
Remember Variables from earlier? You’ve just created 2:
$GivEnergyPortalAPI
$SerialNum
Each time the script calls those 2 variables the machine will actually see your API key and Serial Number.
So now onto what each line is doing:
11   ##Go Fetch Data##
12   ##Calls Givenergy API and shows current status
13   $headers_Giv_En = @{
14   'Authorization'="Bearer $GivEnergyPortalAPI"
15   'Content-Type'='application/json'
16   'Accept'='application/json'
17   }
Lines 11 & 12 are just comments. Anything with 2 ## Symbols the script ignores. It just makes life easier when you note what does what.
Line 13 is creating a new variable called $headers_Giv_En to allow us to reference the headers required to be sent to the API. The opening { at the end of this line signifies that the variable continues until the closing } bracket on line 17. (You can have code over multiple lines rather than one really long one!)
Line 14 – 16 is the specific headers that the API requires (as we noted earlier)
Note: Line 14 is where we send the API the API Key. In this instance as we already have the API Key defined as a variable we can simply call it up as part of the script without writing it out each time – hence you can slot in $GivEnergyPortalAPI and it will send the full API key for us.
Line 17 is where we close this entire variable by using a closing curly bracket }
18 $Giv_En = Invoke-RestMethod -Method 'Get' -Uri https://api.givenergy.cloud/v1/inverter/$SerialNum/system-data/latest/ -Headers $headers_Giv_EnLine 18 is where the actual call to the API is made. We create yet another variable ($Giv_En) which allows us to store the ENTIRE response from the API (so you can use the data later on)
“Invoke-RestMethod -Method GET” basically is the command for Powershell to send a request of the GET type.
“-URI https://api.givenergy.cloud/v1/inverter/$SerialNum/system-data/latest/” is the URL to send the request to. Note that again the variables created earlier can be placed into the URL so your Serial Number is what actually the API sees.
“-Headers $headers_Giv_En” is appending the headers from above lines, in a block (lines 14-16) and sending them as part of the request. Again you can see this is done by calling a variable rather than having to type the headers out again. (Yes it seems pointless on this example as it only does one thing, but remember you could have this script do multiple different calls and, as your API key, serial, headers are always the same you can use the same variables over and over. Plus if you ever change your API key, you only need to change it once at the top rather than every single time!)
19 $Giv_En | ConvertTo-Json -Depth 10 | Out-File -FilePath .\InvData_Now.txt -Encoding ASCIILine 19: So as above, we submitted a request using the “Invoke-RestMethod” as part of a variable named $Giv_En.
This means that the entire response to that request is now stored in the variable $Giv_En.
That’s great, but we kind of need to see the response data to make sure it’s worked. So what we can do is dump that variable to a text file by “piping” it (the | symbol) to various other mini commands available in powershell.
First we Pipe the contents of $Giv_En to the “ConvertTo-JSON” program which makes sure the response is true JSON which we want. (The Depth part is how many “layers” or “Directories” of JSON you want it to convert.)
Then we Pipe the output of “ConverTo-JSON” to a text file using the “Out-File” Command.
The Directory you send the file to & it’s name can be changed to whatever you want. In this case it’s sent to “.\InvData_Now.txt” which will place it in the same directory as wherever you saved the Powershell Script to: with the name of InvDate_Now.txt
The encoding part at the end just makes sure the file comes out in a format that is legible.
21   Write-Output "Data Saved to: InvData_Now.txt"
22   Write-Output "All done - Exit in 5...."
23   start-sleep -s 5

25   Exit
Line 21 and 22: “Write-Output” simply writes whatever you type after it between inverted commas ” ” to the command line.
Line 23: Pauses the script for 5 seconds (to give the user time to read the above messages)
Line 25: closes the script.
Running the Script
So now we know what does what, we can run the script.
Making sure its saved, navigate to the file and right click > Run With Powershell.
(You should get a blue command interface pop up)
It may or may not ask you if you want to run this for security reasons. Select “y” (or I think from memory it’s “a” to accept for all)
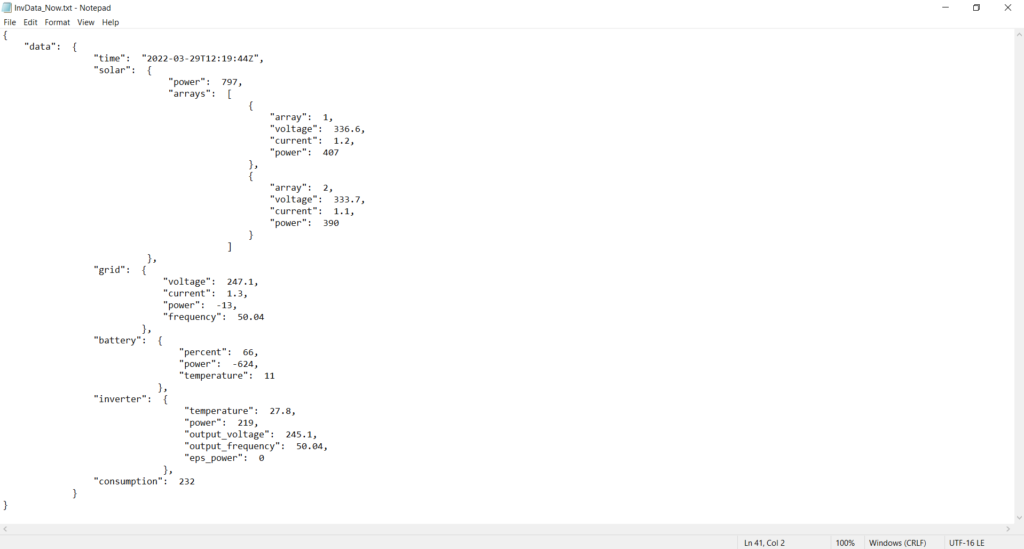
The script should run and if successful, you will end up with a text file in the same folder as the script named “InvData_Now.txt”
If you open it you will have your own latest inverter data – and your fist call to the API.
Now you should in theory be able to change the URL in the script to any other GET type URL for the Givenergy API. Remembering to change the output filename will allow you to have multiple scripts being able to be run in the same folder. I have included some examples at the end of this page.
Example 2 (Getting Settings Lists):
For whatever reason, the settings for the Inverter from the Givenergy API are coded into Setting IDs. This makes life a little more complicated as your hunting around for a numerical ID for say “Battery Charge Rate” rather than something in plain English. To help, the API has a call to return all the settings IDs applicable to your specific Inverter.
The method to carry out this call is exactly the same as Example 1 with the URL changed as below:
#####User details here#####
##Givenergy Portal API Key Goes Below between " "
$GivEnergyPortalAPI = "YOUR_COMICALLY_LONG_API_KEY_GOES_HERE"
$SerialNum = "INVERTER_SERIAL_GOES_HERE"
########end user input#############
##Go Fetch Settings##
$headers_Giv_En = @{
'Authorization'="Bearer $GivEnergyPortalAPI"
'Content-Type'='application/json'
'Accept'='application/json'
}
$Giv_En = Invoke-RestMethod -Method 'GET' -Uri https://api.givenergy.cloud/v1/inverter/$SerialNum/settings -Headers $headers_Giv_En
$Giv_En | ConvertTo-Json -depth 10 | Out-File -FilePath .\Inverter_Settings_ID.txt
Write-Output "Data Saved to: Inverter_Settings_ID.txt"
Write-Output "All done - Exit in 5...."
start-sleep -s 5
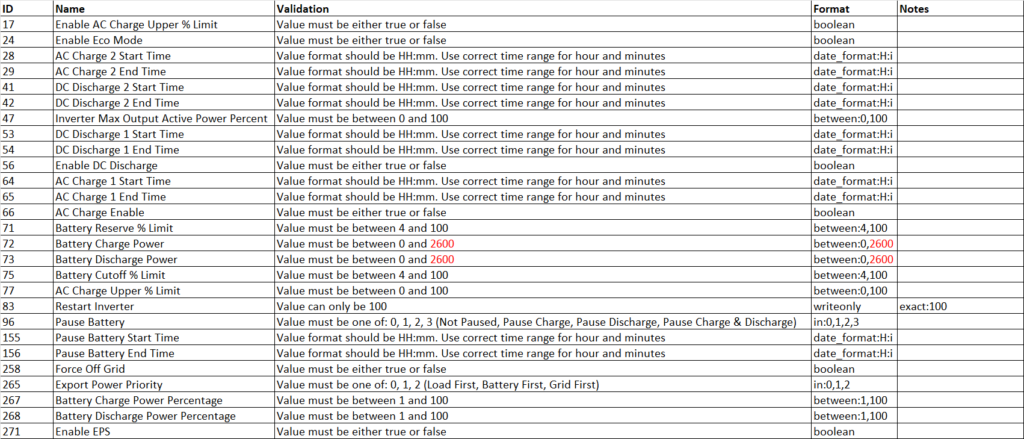
Exit For clarity and to just make life generally easier I’ve converted the settings ID’s into the table below:
(This is for a first Generation Hybrid 5kW Inverter, although I doubt there are any changes across the range other than the maximum charge rate of the battery being higher than 2600W if you have an AC Coupled Inverter)
Example 3 (Getting Data IN):
So the first example of getting started with the API was just pulling data down. But this is a 2 way street so we can send data to the API to get the inverter to do something (i.e. say we want to pause the battery output because we have an EV on charge and we don’t want to drain the battery)
I’m not going to go through this again in such detail as the script is very similar with only a few changes and additions. See below:
#####User details here#####
##Givenergy Portal API Key Goes Below between " "


$GivEnergyPortalAPI = "YOUR_COMICALLY_LONG_API_KEY_GOES_HERE"
$SerialNum = "INVERTER_SERIAL_GOES_HERE"
$min_Rate = "0"


########end user input#############

##Go Write Setting##

$headers_Giv_En = @{
 'Authorization'="Bearer $GivEnergyPortalAPI"
 'Content-Type'='application/json'
 'Accept'='application/json'
 }

$body = "{`"value`":`"$min_Rate`"}"

$Giv_En =  Invoke-RestMethod -Method 'POST' -Uri https://api.givenergy.cloud/v1/inverter/$SerialNum/settings/73/write -Headers $headers_Giv_En -Body $body

$Giv_En | ConvertTo-Json | Out-File -FilePath .\Battery_Status.txt

Write-Output "Value Sent: " $Giv_En.data.value
Write-Output "Success: " $Giv_En.data.success
Write-Output "Message: " $Giv_En.data.message
Write-Output ""
Write-Output "Data Saved to: Battery_Status.txt"
Write-Output "All done - Exit in 5...."
start-sleep -s 5

Exit
So you should hopefully have spotted at the top, you have an extra variable: $min_Rate = “0”
In this instance this is basically the watts you want to set the battery (0 is to all intents and purposes turning the battery off or pausing it)
Further down, you will see the variable $body – this should immediately tell you that we are dealing with a POST request (as GET requests don’t use the Body.)
$body = “{`”value`”:`”$min_Rate`”}”
Inside the Body variable you can see we are sending a the API a key named “value” and the value of this we are sending is the variable $min_Rate we set earlier. So we are essentially sending a value of 0 as we want to stop output from the battery.
For the URL, we have changed this to the applicable “Settings ID” from the table in Example 2. In this case it’s ID 73: Battery Discharge Power. Also note that the Invoke-RestMethod has been changed to ‘POST‘ type and the $body variable has been added to the end along with the normal headers.
The only further changes are to the Write-Output which the user sees. If you can recall “Dot Notation” from earlier you can see this in action. I’ll explain:
a) When you send a POST call to the API, the API will respond with a message stating whether or not it has accepted the request and also repeat the value you sent to it (so you know it’s been accepted). This gets stored in the $Giv_En variable just like before.
b) This response is in JSON, exactly like the previous examples, which means we can display to the user what the response said if you know the path to the parts you want. So using the JSON Path Finder again you can map a route to the data like so:
$Giv_En.data.value
In this example, that should return the value 0.
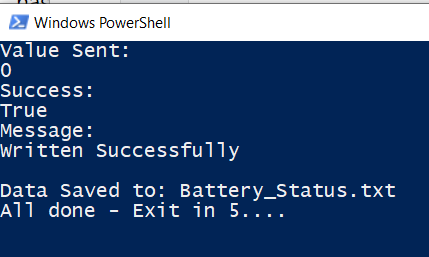
There are a few other bits of data in the response we can display, so this is why there are a few extra lines:
Write-Output “Value Sent: ” $Giv_En.data.value
Write-Output “Success: ” $Giv_En.data.success
Write-Output “Message: ” $Giv_En.data.message
Running the Script:
As before, saving this file and then running it will send a request to the Inverter to set battery Output to 0W.
Obviously you’d probably want to turn it back on again once you’ve checked it’s worked. You can do this by setting $min_Rate variable back to whatever value you choose (I have found that if you set the value higher than the system allows, the API will just set the value to the correct maximum so don’t worry if you set this wrong!)
It would probably make sense to save a copy of the Powershell file and then adjust the values accordingly. That way you can have 2 scripts – one for “Pause Battery” and one for “Resume Battery”
Note: Don’t panic if this doesn’t work or something gets stuck. All these values can be changed in the Cloud Portal anyway so you can just reset them there if all else fails.
Finally
Hopefully this has been a fairly useful introduction to the Givenergy API and how to use it’s basic calls.
Have a play with some of the other calls from the API by changing the URLs requested to get a feel for how it behaves. Remember you can also trigger these scripts up from Windows Task Scheduler, so you can run them at specific times of the day if you leave your PC running.
To get the best from the API, you will want to actually do something based on conditions of something else (i.e. if this happens > then set the inverter to do that…. kind of thing.) I’ll sort some more complex examples of this on another post later on.
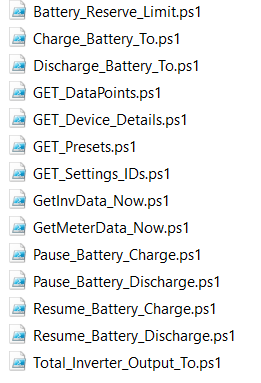
Downloads
Example scripts for many of the API calls can be found below:
Version 2.0 05-04-2022
Included in the examples are:
5 Responses
Thanks for this Hoggy – helped me sort it out in NodeRed – even though the calls formatting is different it helped no end!
Really intesting reading and will be looking to take your information here (well put together) and implement in the future. Thanks!
Many thanks for all the time and effort in putting this together. I have just had a GivEnergy solar / battery installed and I am now looking formward to getting into the API based on your work.
Excellent summary. I use giv_tcp extensively for reading the inverter status, and it’s great for that. But I was having bother with local control when setting charge value, struggling to get it reliable. Your detail here got me up and running to the cloud API in no time at all.
Thanks for this page – it’s a great help.
I’m able to “Get” all the data down using the API without an issue using:
“GET”, “https://api.givenergy.cloud/v1/inverter/” & serial & “/system-data/latest” with the three headers – and all works fine – 100%.
However, I’m not getting any luck trying to “post” to the inverter API – even though I’m getting a 200 response.
By the same syntax I’ve used for the “GET” process, I’m now trying to “POST”, “https://api.givenergy.cloud/v1/inverter/” & serial & “/settings/72/write”
and send:
{“value”:”1234″}
Where the value is a number between 0 and 3600
Is this format correct?
Any comments welcomed.